Martin's HelpDesk

  • Home
  • About
  • Support
  • Services
    • Web Listings →
      • Events Demo
      • Create a Forum
      • Create a Job Listing
      • Create a Property Listing
    • IT Services →
      • IT Care Plans
      • Backup
      • Smart Phone Setup
      • ESET Security
      • Email Security
      • Job Tracking
    • Web Services →
      • Domain and Hosting
      • Web Development
      • Web Listings
      • eCommerce
  • Testimonials
  • News
  • Contact
You are here: Home / Archives for Projects

29 January, 2021 by Martin Vines Leave a Comment

Google Photos

Revised on 29/01/2021

Starting June 1, 2021, any new photos and videos you upload will count toward the free 15 GB of storage that comes with every Google Account or the additional storage you’ve purchased as a Google One member. Your Google Account storage is shared across Drive, Gmail and Photos.

This means that unlimited free storage for all your photos and videos will end on 21 June 2021. All existing photos will remain on Google Photos free of charge.

Note: this applies to high quality photos and videos and not original quality photos and videos. These already counts towards your storage limit.

Your photos start with the camera on your smartphone and the Google Photos app.

All Android and iPhone users can enjoy using Google Photos with a Google account.

Google Photos works with your smartphone and your Google account storing your photos and videos in the cloud with the option of freeing up storage space on all your devices once they have been uploaded.

Viewing your photos and videos

  • On any device: Open the app called Photos
  • On a computer: https://photos.google.com
  • Speaking: Using the Google Assistant (“OK Google”), “Show my photos”[“on Device_Name”]

Features

Google Photos offers the following features:

Photos

  • Memories (with slideshows showing the same week – 1 year ago, 2 years ago etc.)

Albums

  • Lists of Favourites, People & Pets, Places, Things, Videos, Collages, Animations and Movies.
  • Photos stored in other folders on the device (e.g. WhatsApp)
  • Albums (Photo Sharing and created albums)

For you

  • Create New (Album, Photo book, Movie, Collage, Animation)

Sharing

  • All the photos you have shared with others and what others have shared with you.

Getting Google Photos to work with your device

Search for the Photos app which may already be installed on your device.

If not then install Photos from Google Play or the App Store (Apple).

Sign in with your Google Account

Tap the box in the upper right corner to reveal the sign in details and the email address of the Google Account. Check that your photos are being backed up by finding the notice: “Backup complete”.

This is also a good opportunity to Free up the space your photos are taking up on your device. Tap “Free up ??? MB“. You will then be ready to free up space on your device – tap again at the bottom to free up device space.

If these are not shown then sign in with your Google Account and check that the photos are being backed up.

This is a good opportunity to look at the Google Photos settings.

Tap the photos settings icon (cog) on the account pop up screen

Backup and sync

Make sure that…

  • “Back up & sync” is turned on and then under this setting check the following….
  • The correct email address of your Google account is shown
  • “Upload size” is set to High quality (free unlimited storage until 21 June 2021) or Original quality if you are comfortable with your current storage allowance/ plan. Depending on how many photos you have you may want to opt for a yearly storage plan of 100GB (£15.99), 200GB (£24.99) or 2TB (£79.99).
  • “Back up device folders” is set to include the folders on the device that you wish to show others from your Google photos. Therefore most users may not want to include the WhatsApp Photos in their library. For more information on this see the section called WhatsApp below.

Mobile data usage

Turn this on if you don’t mind using your mobile data plan to immediately backup or synchronise your photos when NOT on a Wi-Fi connection.

Note: Otherwise this will then use your mobile data allocation especially if you are taking photos outside of a Wi-Fi connection.

Using the Photos app

On opening Google Photos, you will see the following tabs at the bottom of the screen:

Photos | Search| Library

With either Photos selected, change the size of the thumbnails by using “Pinch-to-zoom” (Touch two fingers on the touch screen, and move them apart to zoom out, or together to zoom in).

Tap on a photo to open it, pinch-to-zoom can be used at any time to zoom in. Once zoomed in drag your finger in any direction to move around the photo. Double tap to bring the photo back to fit the screen. Then swipe left or right to go to the previous or next photo.

Photos are usually arranged with the most recent at the top. As you drag your finger up or down the screen, a side button will appear on the right side with up and down arrows. Quickly put your finger on this button and move it downwards or upwards. When browsing in the Photos tab in this way, a time line will appear showing the years with a larger pop up showing the current month and year position.

Create an Album

Photos can be allocated to an Album.

There are various ways to create and album but the common way is as follows:

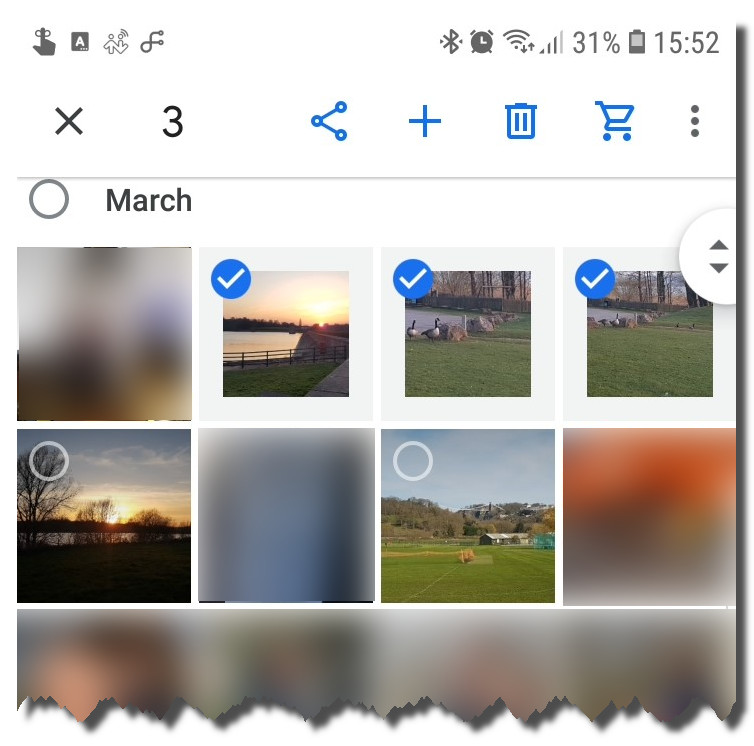
  1. Hold your finger on a single photo until the photos show a round grey circle in the top left corner. With this “select photos” view, the selected photo will get a tick in that circle and a new icon menu appears at the top of the screen.
  2. In this “select photos” mode, tap individual photos to select them accordingly.
  3. Tap the + button on the icon menu.
  4. EITHER
    under “CREATE”, creates a NEW album if you don’t already have an album to add these photos to
    OR
    scroll down to the RECENT or ALL ALBUMS sections and select the album you want to add the selected photos to.
    Under create you have the option to create an Album, Shared album, Movie, Animation or Collage with the already selected photos.

Albums are collections of photos that have been tagged with an album name. This means that when you delete an album, you are in fact just deleting the tag name and not the photos that were in that album. The photos will still remain in the Photos tab at their respective time line position.

SlideShow

It appears that the Google Photos app on your mobile device no longer supports slide shows.

You can however find an app in the Play Store that creates slideshows.

Sharing

Photos

You can share your photos by selecting individual photos. Now tap the share button.

Albums

For multiple photos I recommend creating an album of these photos first and then opening that album to share the album.

To share an album, tap on the album to enter into the album, tap the three vertical dots, then Share.

Sharing Options

The two sharing options called “Get Link” and “SEND IN GOOGLE PHOTOS” don’t actually attach copies of the photos to the share. This means there is no usage of space or copies made.

Get Link

The safest way to share is to tap the “Get link” icon. This creates a link code which is then stored in the device’s clipboard. Then you can proceed straight to an app under the “Link copied. Share it in an app.” And it will open the app you select and paste the link for you. Leaving you to select a recipient and add any other wording in the message before you send it.

Any recipient of the message can click on the received link to view and download the photos. If they also have a Google account there will be an option to “Add to Library”. This then takes those same photos and adds them to their own library maintaining each photo’s exif information such as the date it was taken and the location. This way, no photos are downloaded or stored on the device.

SEND IN GOOGLE PHOTOS

You can send in Google Photo to any other user who has a Google Account. Use the magnifying glass icon to search by name, phone number or email address. Only those contacts in your address book with Google email addresses (or those with Google accounts) will be displayed. Note: you don’t need a Google email address to have a Google account.

The recipient will get a notification from Google. They can then select to “Add to Library”. This is recommended because the sender may at a later stage decide to delete the share. If that happens and the recipient has not yet added to their library then the recipient will no longer have access.

Other Share options

The other share options all involve making or attaching a copy of the photos in other apps. This can cause issues with bandwidth, data plans or space on both your and the recipient’s device.

WhatsApp

People attaching videos and photos to WhatsApp messages (instead of using “Create link” as explained above) clog up the memory on a device.

Many smartphone users have a restricted amount of storage space on their device and soon run out of space.

Keep your device’s storage space free from WhatsApp photos and videos BUT keep the ones you want in your Google Photos library.

Here’s how to do it.

  1. In WhatsApp tap and hold on the media (image or video) you want to keep.
  2. Tap the share icon
  3. Tap on Upload to Photos
  4. Tap the button “Upload”
  5. Back on the conversation screen in WhatsApp, tap and hold on the media (image or video)
  6. Tap the delete icon
  7. Tap Delete for me

Otherwise, view and enjoy the media you receive then DELETE it!! – See Steps 5, 6 and 7 above.

Other Photo Viewing and Syncing Options

On some devices you can choose to use the manufacturers offering instead of or in addition to Google Photos.

We’ll briefly cover the popular brands below.

Samsung

Samsung’s app is called Gallery and works in a similar way to Google photos where photos and videos are synchronised to your account in the Samsung Cloud.

There are price plans for storage greater than the free 15GB, starting at £0.79 per month (50GB).

Viewing your photos and videos

  • On any signed in Samsung device: Open the app called Gallery
  • On a computer: https://support.samsungcloud.com and click on Gallery

iPhone

The Apple iPhone’s app is called Photos and works in a similar way to Google photos where photos and videos are synchronised to your account in Apple iCloud.

There are price plans for storage greater than the free 5GB, starting at £0.79 per month (50GB). The higher plans are for 200GB and 2TB.

Viewing your photos and videos

  • On any signed in Apple device: Open the app called Photos
  • On a computer: https://www.icloud.com/ and click on Photos

Huawei

Huawei’s app is called Gallery and works in a similar way to Google photos where photos and videos are synchronised to your account in Huawei Cloud.

There are price plans for storage greater than the free 5GB, starting at £0.79 per month (50GB). The higher plans are for 200GB and 2TB.

Viewing your photos and videos

  • On any signed in Huawei device: Open the app called Gallery
  • On a computer: https://cloud.huawei.com/ and click on Gallery

Need any help with your photos?

We offer a help service to get all your photos on-line and in order:

  • Scanning/ taking photographs of existing paper photos or scanning of negatives to create digital copies for upload.
  • Help you setup your Google Photos with a Google account.
  • One-on-One training in working with your photos, creating albums, collages, films, animations and photobooks.
  • How to edit your photos and change the date taken so that they appear correctly in your timeline.
  • Setting up People and Pets so you can attach a name to a face (e.g.: “Jim”) and have Google do the rest. Google can then put the same name to that face for all your photos. All you then have to do is say “Show all photos of Jim”.
Ask us for a quote

Filed Under: Projects

4 April, 2020 by Martin Vines Leave a Comment

Google Music

Get all your own music on all of your devices for free with no adverts (up to 100,000 songs)!!

Order your Google Music upload

Wouldn’t it be great to be able to listen to music at any time simply by saying “Play my music”?

To get music for all your devices you have a few options.

  1. Subscribe to a music service and use their app to play the music. The popular music services are: Spotify, SoundCloud, Jango, Deezer, Amazon Music, Google Play Music, Apple Music.
    (Some of the above are subscription based or free with adverts)
  2. Copy your existing music (CD’s and files) onto the storage of all your devices and use an app to play your music.
  3. Copy your music once to a cloud provider and use their app to play your music on all your devices.

In this instance I am going to cover no 3 above using Google Play Music.

Google Play Music

With Google Play music you have a Free option or a Subscription option.

Free: Upload your songs to Google Play Music. You are allowed up to 100,000 songs. There is no charge at all.

Subscription: The same as the Free option but for £9.99 per month you get ad-free on-demand streaming of over 40 million songs, unlimited radio and a subscription to YouTube Music. For £14.99 you can include the family of up to 6 members.

Subscription

To subscribe to Google Play Music:

  1. Website: https://music.google.com.
    Make sure you are logged in with the SAME Google account you use on all your devices (Tablet, Mobile, Google Nest etc.).
  2. Click the three stripes on the top left and click SUBSCRIBE
  3. Choose INDIVIDUAL or FAMILY and follow the prompts to set up your payment.

Now you can listen, play internet radio and watch YouTube Music video as much as you like and on any connected device which is logged in using the same account. You can also create playlists of up to 1,000 songs per playlist.

Use Google Play Music for Free

If you already own a CD collection, save yourself almost £100 per year and upload up to 100,000 songs to your Google Music account. Want to add more songs you don’t already own? – buy them directly from the Google Play Music Shop. If you are spending less than £100 per year on your new purchases you would still be scoring. Individual songs are usually £0.99 and albums between £5.99 and £10.99.

How to get your CD collection into your Google Play Music account

  1. Rip your CD’s to your Music Library on your computer
  2. Upload to Google Play Music
  3. Create custom Playlists
  4. Listen to your music on any of your devices.

Rip CD’s to your Computer

Preparation

What you will need:

  • A computer with a CD/DVD Drive
  • Windows Media Player on a Windowss computer or iTunes on an Apple computer. These are already installed. There are other software options, but these work fine.
  • Music Manager (Software from Google)
  • A collection of music CD’s (1 or more)

Get your existing music files and software ready

Below are my recommendations for a smooth experience and the best sound quality

Music folder on your computer

ALL files in your Music folder will be added to Google Play Music. If you already have stored music in your Music folder, it is important at this stage to delete or move unwanted songs to another location on your computer.

Windows Media Player

  1. Open Windows Media Player (Start>Windows Accessories> Windows Media Player)
  2. In the menu, click Tools>Options: select the Privacy tab>untick “Download usage rights automatically when I play or synchronise a file
  3. In the menu, click Tools>Options: select the Rip Music tab> under Rip settings>Format, select the drop down and choose MP3, untick Rip CD automatically, tick Eject CD after ripping, under Audio quality move the slider to Best Quality (320 Kbps).
  4. Click OK
  5. Close Windows Media Player

iTunes

Please see the following video which guides you through the process.

Transfer Music to Google Play Music

There seems to be three methods in uploading your music files to Google Play Music. Using…

  1. The Google Play Music web page (not recommended)
    Click the 3 stripes on the top left>click + Upload music and drag songs from your Music folder using Windows Explorer or use the SELECT FROM YOUR COMPUTER button.
  2. A Google Chrome Extension (not recommended)
     Click the 3 stripes on the top left>Settings, scroll down to ADD YOUR MUSIC, click INSTALL. This then takes you to the Chrome Web Store>Google Play Music. Click Add to Chrome. Note: Be careful when using this extension as the default setting performs a scan of both the Pictures and the Music folders for audio files. You can unselect this option and change the selection to a custom folder – e.g. Music.
  3. Music Manager (recommended)
    (Windows, Mac and Linux)

Using Music Manager

Before ripping your CD’s make sure Music Manager is setup correctly on your Windows computer.

  1. Download Music Manager: https://play.google.com/music/listen?u=0#/manager
  2. Once saved in your Downloads folder, click on the downloaded file (bottom left of the Chrome window) and install the software.
  3. Sign in with your Google account
  4. For further options find the Music Manager options:
    >In the System Tray, click the up arrow to show hidden icons (bottom right of the main computer screen), find the Music Manager icon, right click >Options>Advanced.
    >Untick Start automatically when computer is restarted (recommended).
    >You can sign in and out in the Music Manager should you wish to manage someone else’s Music. In this case store their music in a different folder and Change the location of the music collection on this same “Advanced” tab.

RIP your CD’s

Get ready to start ripping your CD’s

If you have followed the recommended guides above please follow this procedure:

Start the Music Manager before ripping your CD’s to your computer:
Start>Music Manager>Music Manager

Put your music CD into the CD/ DVD drive.

Opening Windows Media Player

If nothing happens when the CD is inserted, open Windows Media Player (Start>Windows Accessories> Windows Media Player).

If you get a prompt from Windows as to what to do when an audio CD is inserted into the drive, click Open with Windows Media Player. It may be opened in Now Playing mode. If this is the case, then switch to Library (icon at the top right of the Now Playing Mode window).

Selecting the songs to rip

In the Windows Media Player library a list of songs on the Audio CD will be displayed. Put a tick mark in the box for each song you would like to rip to your computer. You can sample each song simply by double clicking on the song.

Once you are happy with your ticked selection, click “Rip CD” in the player task bar which is found along the top of the Windows Media Player window.

The CD should eject when the ripping is complete. At the same time, Music Manager will detect new songs in the Music folder and automatically begin uploading these to your Google Play Music account.

Creating Play Lists

Open the Google Play Music website: https://music.google.com

You can now add either individual songs or albums (multiple songs) to a playlist.

You can create a new playlist on the fly as you are adding songs or use the Playlist drawer. The Playlist drawer is the icon at the top right with three horizontal stripes with the small right pointing arrow at the bottom stripe. Once clicked, click the + button to create a new playlist name.

Click on Music Library on the left task pane. Click on either the Albums or the Songs tab at the top. You can click the vertical ellipsis (three vertical dots) or right click on a song and select “Add to playlist” and choose a playlist.

Playlist name ideas

“Love Songs” for those romantic, candlelit evenings.
“Dance Music” for discos, dancing or parties.
“Relaxing Music” or something like that when its time to sit back and relax.

Listening to your music

Now you are ready to listen to your music.

What you will need to listen to your music

Any signed in device such as

  1. A computer opened on the https://music.google.com web site
  2. A tablet or smartphone with the Google Play Music app
  3. A Google Home or Nest mini
  4. Google Chromecast connected to a monitor or TV
  5. A good quality speaker or pair of speakers connected by cable or bluetooth to the computer, tablet, smartphone, monitor or TV.

Now simply give a voice command using the Google Assistant to play your music

E.G. “Ok Google, play [song name] [album name] [on [name of chromecast device]]”
Further commands you can use:
“Ok Google, play next”
“Ok Google, volume down”
“Ok Google, volume up”
“Ok Google, set volume to [number 1 – 10]”

Would you like help setting up your music?

We charge £1 per CD to upload to your Google Play Music account

We’ll upload all songs from each CD and it will then be up to you to delete the songs you don’t like and create your own playlists.

Google Play Music
Please enter your first name
Please enter your surname
Enter a company name (optional)
Address
Street
Suburb
City
County
Postal Code
Please complete ALL address fields
Please enter a telephone number
Please enter an email address
Upload CD to Google Play Music

CD Upload (each): £ 1.00

Please count all the CD's and enter the total here
Total

Collection and Delivery
Bristol and Bath areas only
Leave the above un-ticked if you are able to bring the CD's to Martin's HelpDesk
£
Terms and Conditions...>
Please allow 24 hours per 100 CD's or part thereof.
We will email you to confirm your drop off day and time option.

  • The CD's supplied must be standard audio CD's or CD's with MP3 files. All other CD's will be omitted
  • You must supply us with your Google account details for us to perform the process. We will discard the account records when the job has been completed
  • Removal of unwanted tracks and creating playlists can be done by logging into your Google Play Music account

**This must be taken within 2 weeks from date of payment. You will receive an email requesting to book a time and date. If no response is received within two weeks your payment will be forfeited.

Please provide us with 2 date and time options within the next 2 weeks
:
:

PayPal Acceptance Mark

cheque

Pay by cheque
Please make your cheque payable to:
Martin's HelpDesk
and post your cheque to:
Martin's HelpDesk
156 Hungerford Road
Brislington
Bristol
BS4 5EZ


Enter the Card No, Expiry Month / Year, last 3 digits (CVC) on the back of your card and postal code if prompted.
This payment method adheres to the new European regulation introduced on 14 September 2019 which mandates Strong Customer Authentication (SCA) for online card payments. ...More Info
Essentially SCA may prompt you for additional authentication to complete a payment.
Sending

Filed Under: Mobile, Projects

1 October, 2019 by Martin Vines Leave a Comment

Integrate your Business Calendar in Google and Outlook

Without Google G Suite, it is still possible to integrate your business calendar and appointments within your private Google Account.

Requirements:

  • Google Account
  • Microsoft Outlook

Microsoft Outlook (part of Microsoft Office)

Create an additional Calendar to your normal Outlook Calendar and give it the name of your business. Create an additional Calendar in your Google Account and give it the name of your business.

Install gSyncit

gSyncit is an Outlook plugin that enables the syncing of Outlook calendars, contacts, notes, and tasks with your Google account.

The installation of gSyncit makes sure that whatever is added or changed for an appointment or a contact is also reflected across all Google connected devices and applications. This then updates your Outlook, your mobile device (phone and /or tablet) and your Google account on the Web.

(gSyncit also works with other popular online accounts too).

Purchase and Install gSyncIt. gSyncit cost $19.99.

(Around every second year, a full version upgrade cost $12.99.)

In the gSyncit settings, Google Sync, Calendar Sync, setup gSyncit to synchronise

  1. your personal calendar
  2. your business calendar

I suggest you also setup to synchronise Contacts in Contact Sync.

Lastly, in Application Settings, Sync Options, tick Enable automatic synchronization.

How to create a new calendar appointment with attendees

It is useful for your attendees to accept appointments you make and have these appointments automatically added to their calendar. This ensures that you both have the same information about the subject, date, time and location of the appointment.

In Outlook, go to your business calendar

Create an event as normal

Click Invite Attendees

This will add a To… field where you can type email addresses of the attendees.

Enter Subject, Location Start and End time (including the dates) and enter some details in the appointment body.

Note: The subject and appointment details will also appear for the attendees, so make it relevant for them.

Click Send

The following warning message will appear

Click Yes

A notification is received when an attendee accepts an appointment:

In your Outlook Calendar the meeting will have a note at the top: No responses have been received for this meeting. This follows the warning received previously about responses not being tallied.

Rest assured you still have the notification message in your Inbox that the meeting has been accepted.

Would you like us to set this up for you?

Please submit an installation service request or a support request and we’ll get back to you to arrange an on-line / desktop sharing consultation. We estimate the setup procedure would take us just half an hour.

Filed Under: Projects

12 April, 2018 by Martin Vines Leave a Comment

FaceBook Messenger Project

What is FaceBook Messenger ?

Facebook Messenger is a messaging app and platform.
Originally developed as Facebook Chat in 2008, the company revamped its messaging service in 2010, and subsequently released standalone iOS and Android apps in August 2011.
You need to be a FaceBook member. Users can send messages and exchange photos, videos, stickers, audio, and files, as well as react to other users’ messages and interact with bots. The service also supports voice and video calling.
An alternative for messaging, voice and video calling is WhatsApp (also owned by FaceBook) but neither user needs to have a FaceBook account.

I recently had a client who had a 5 year long FaceBook Messenger chat history with one other person. When I logged into the Messenger account to download the history, all I could get was the past six months of history. After a bit of research I found a Google Chrome Extension called  “Message/Chat Downloader“. After a few errors I realised that I had to limit the time frame of conversation before attempting a download. After each download I printed to pdf and landed up with 19 pdf documents – totalling 5,847 pages (containing an exchange 161,071 messages). I then used a free program called PDF Redirect to merge these 19 pdf files into fewer pdf documents to deliver to the client (5,847 pages would not fit into one pdf document).

The client then requested a printout of all 5,847 pages. I then had a problem as the pages were not numbered. I could only find software that would number one pdf document from Page 1 until the end, but because I had multiple pdf files I needed to edit the page number of the first page for the consecutive files. So I signed up for a free one month trial of Adobe Acrobat Pro DC which would allow me to do exactly that.

I found a reasonable printer in Wotton-under-Edge who did the printing for me double sided on A4 paper.

Job Done!

Filed Under: Projects

View All Testimonials

Thanks Martin, the advice on the “Spybot” software fixed the problem with our PC, everything is now back to normal, just as you said it would be!!!!!!!!!!! ;)

— Jim MacLeod

Recent Posts

  • FreeFileSync 2 January, 2023
  • Google Photos 29 January, 2021
  • Emergency on Huawei Phone 1 July, 2020

Follow Us On…

Follow us on FaceBook   Follow us on LinkedInFollow us on Twitter

Contact Us

Call 0117 911 8064
Martin's HelpDesk
35 Blenheim Drive
Filton
Bristol
BS34 7AX

Privacy Policy

Copyright ©Martin's HelpDesk 2018. Developed and Designed by martin's HelpDesk using the Genesis Framework and Executive Pro Theme