Martin's HelpDesk

  • Home
  • About
  • Support
  • Services
    • Web Listings →
      • Create a Forum
      • Create a Job Listing
      • Create a Property Listing
    • IT Services →
      • IT Care Plans
      • Backup
      • Smart Phone Setup
      • ESET Security
      • Email Security
      • Job Tracking
    • Web Services →
      • Domain and Hosting
      • Web Development
      • Web Listings
      • eCommerce
  • Testimonials
  • News
  • Contact
You are here: Home / Archives for Mobile

1 July, 2020 by Martin Vines Leave a Comment

Emergency on Huawei Phone

In a medical emergency, the services look to your phone as the first point of information.

A simple swipe upwards on the phone lock screen and a tap on the word EMERGENCY should reveal the emergency screen with an option to view “EMERGENCY INFORMATION“.
If there is nothing there then this tutorial is for you!
Set up your emergency information now and prepare for the loss of your phone or for your own medical emergency.

Below is a guide for setting up your emergency information on your Huawei phone.

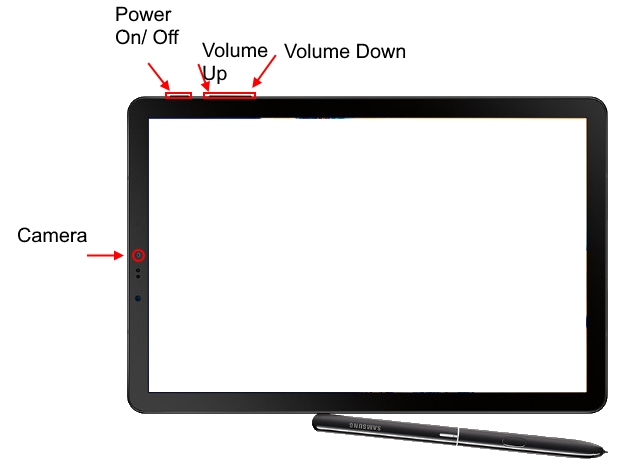
Previously I wrote a similar procedure for the Samsung phone.

Huawei first requires you to create a business card about yourself before presenting you with the option of Emergency Information. Thereafter, once your Emergency information is added, you can add up to 3 Emergency Contacts.

Before you start make sure your intended emergency contact names are recorded properly in your Contacts – E.G.
First Name: Bob, Last name: Smith, Mobile: +44 7804…
It is important to add +44 (country code) in front of all your UK numbers in case the contact needs to be called from abroad while you are travelling.

1.

On your phone open the Phone app and select the Contact tab at the bottom or open the app called Contacts directly.
At the top of your contacts list you should see Groups, Business cards and My card. Tap on My card.

2.

Enter your Name, Organisation (if applicable) and as many other details as possible. Tap ADD MORE FIELDS to make sure you have covered everything. Tap on the camera icon at the top to include an image of your face. When finished tap the tick mark in the top right of the screen.

3.

You should now see your name as the Business card as in step 1 above. Tap your name and you should then see your business card appear. It has a QR code in the middle. This QR code (Square type of barcode) contains everything about you. More about this later.

You are now done!

4.

Tap on Emergency Information on the bottom right. Enter as much information about yourself as you can: Blood type, Allergies, Medications etc. Type the word “None“, instead of leaving the field blank (shown as None specified), as this will ensure that the word None is shown when your information is being viewed.

Under EMERGENCY NUMBERS tap on Emergency contacts and tap ADD CONTACT. Find and tap on your preferred emergency contact and phone number to add to your Emergency contacts list. You can repeat this process to add up to three contacts.

QR Code and what it does

The resulting QR code shown in My card (now shown as your name), is for other phone users to add YOU to their own contact list.

Instead of giving someone a business card you can use the My card feature of your phone to pass on your contact details.

  1. Open the Contacts app, tap on your name (My card) and show the person your QR code.
  2. That person then in turn switches on their phone and takes a picture of your QR code, which then saves all your contact information into their Contacts app.
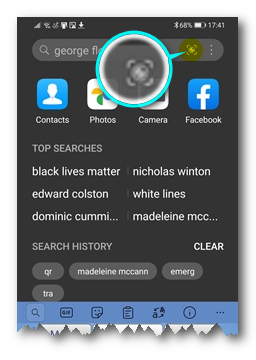
  3. To take a snap of a QR card on a Huawei phone, simply swipe downwards on any home screen and tap the code scanner icon in the top right of the screen, and position the phone above the QR code to capture it.
    QR Code

What else should you do?…

This is just ONE of about 30 steps we do in our comprehensive smartphone setup.
Get an expert to customise your SmartPhone to suit your Work, Play, Travel and Everyday lifestyle.

SmartPhone Setup

Filed Under: Mobile

4 April, 2020 by Martin Vines Leave a Comment

Google Music

Get all your own music on all of your devices for free with no adverts (up to 100,000 songs)!!

Order your Google Music upload

Wouldn’t it be great to be able to listen to music at any time simply by saying “Play my music”?

To get music for all your devices you have a few options.

  1. Subscribe to a music service and use their app to play the music. The popular music services are: Spotify, SoundCloud, Jango, Deezer, Amazon Music, Google Play Music, Apple Music.
    (Some of the above are subscription based or free with adverts)
  2. Copy your existing music (CD’s and files) onto the storage of all your devices and use an app to play your music.
  3. Copy your music once to a cloud provider and use their app to play your music on all your devices.

In this instance I am going to cover no 3 above using Google Play Music.

Google Play Music

With Google Play music you have a Free option or a Subscription option.

Free: Upload your songs to Google Play Music. You are allowed up to 100,000 songs. There is no charge at all.

Subscription: The same as the Free option but for £9.99 per month you get ad-free on-demand streaming of over 40 million songs, unlimited radio and a subscription to YouTube Music. For £14.99 you can include the family of up to 6 members.

Subscription

To subscribe to Google Play Music:

  1. Website: https://music.google.com.
    Make sure you are logged in with the SAME Google account you use on all your devices (Tablet, Mobile, Google Nest etc.).
  2. Click the three stripes on the top left and click SUBSCRIBE
  3. Choose INDIVIDUAL or FAMILY and follow the prompts to set up your payment.

Now you can listen, play internet radio and watch YouTube Music video as much as you like and on any connected device which is logged in using the same account. You can also create playlists of up to 1,000 songs per playlist.

Use Google Play Music for Free

If you already own a CD collection, save yourself almost £100 per year and upload up to 100,000 songs to your Google Music account. Want to add more songs you don’t already own? – buy them directly from the Google Play Music Shop. If you are spending less than £100 per year on your new purchases you would still be scoring. Individual songs are usually £0.99 and albums between £5.99 and £10.99.

How to get your CD collection into your Google Play Music account

  1. Rip your CD’s to your Music Library on your computer
  2. Upload to Google Play Music
  3. Create custom Playlists
  4. Listen to your music on any of your devices.

Rip CD’s to your Computer

Preparation

What you will need:

  • A computer with a CD/DVD Drive
  • Windows Media Player on a Windowss computer or iTunes on an Apple computer. These are already installed. There are other software options, but these work fine.
  • Music Manager (Software from Google)
  • A collection of music CD’s (1 or more)

Get your existing music files and software ready

Below are my recommendations for a smooth experience and the best sound quality

Music folder on your computer

ALL files in your Music folder will be added to Google Play Music. If you already have stored music in your Music folder, it is important at this stage to delete or move unwanted songs to another location on your computer.

Windows Media Player

  1. Open Windows Media Player (Start>Windows Accessories> Windows Media Player)
  2. In the menu, click Tools>Options: select the Privacy tab>untick “Download usage rights automatically when I play or synchronise a file
  3. In the menu, click Tools>Options: select the Rip Music tab> under Rip settings>Format, select the drop down and choose MP3, untick Rip CD automatically, tick Eject CD after ripping, under Audio quality move the slider to Best Quality (320 Kbps).
  4. Click OK
  5. Close Windows Media Player

iTunes

Please see the following video which guides you through the process.

Transfer Music to Google Play Music

There seems to be three methods in uploading your music files to Google Play Music. Using…

  1. The Google Play Music web page (not recommended)
    Click the 3 stripes on the top left>click + Upload music and drag songs from your Music folder using Windows Explorer or use the SELECT FROM YOUR COMPUTER button.
  2. A Google Chrome Extension (not recommended)
     Click the 3 stripes on the top left>Settings, scroll down to ADD YOUR MUSIC, click INSTALL. This then takes you to the Chrome Web Store>Google Play Music. Click Add to Chrome. Note: Be careful when using this extension as the default setting performs a scan of both the Pictures and the Music folders for audio files. You can unselect this option and change the selection to a custom folder – e.g. Music.
  3. Music Manager (recommended)
    (Windows, Mac and Linux)

Using Music Manager

Before ripping your CD’s make sure Music Manager is setup correctly on your Windows computer.

  1. Download Music Manager: https://play.google.com/music/listen?u=0#/manager
  2. Once saved in your Downloads folder, click on the downloaded file (bottom left of the Chrome window) and install the software.
  3. Sign in with your Google account
  4. For further options find the Music Manager options:
    >In the System Tray, click the up arrow to show hidden icons (bottom right of the main computer screen), find the Music Manager icon, right click >Options>Advanced.
    >Untick Start automatically when computer is restarted (recommended).
    >You can sign in and out in the Music Manager should you wish to manage someone else’s Music. In this case store their music in a different folder and Change the location of the music collection on this same “Advanced” tab.

RIP your CD’s

Get ready to start ripping your CD’s

If you have followed the recommended guides above please follow this procedure:

Start the Music Manager before ripping your CD’s to your computer:
Start>Music Manager>Music Manager

Put your music CD into the CD/ DVD drive.

Opening Windows Media Player

If nothing happens when the CD is inserted, open Windows Media Player (Start>Windows Accessories> Windows Media Player).

If you get a prompt from Windows as to what to do when an audio CD is inserted into the drive, click Open with Windows Media Player. It may be opened in Now Playing mode. If this is the case, then switch to Library (icon at the top right of the Now Playing Mode window).

Selecting the songs to rip

In the Windows Media Player library a list of songs on the Audio CD will be displayed. Put a tick mark in the box for each song you would like to rip to your computer. You can sample each song simply by double clicking on the song.

Once you are happy with your ticked selection, click “Rip CD” in the player task bar which is found along the top of the Windows Media Player window.

The CD should eject when the ripping is complete. At the same time, Music Manager will detect new songs in the Music folder and automatically begin uploading these to your Google Play Music account.

Creating Play Lists

Open the Google Play Music website: https://music.google.com

You can now add either individual songs or albums (multiple songs) to a playlist.

You can create a new playlist on the fly as you are adding songs or use the Playlist drawer. The Playlist drawer is the icon at the top right with three horizontal stripes with the small right pointing arrow at the bottom stripe. Once clicked, click the + button to create a new playlist name.

Click on Music Library on the left task pane. Click on either the Albums or the Songs tab at the top. You can click the vertical ellipsis (three vertical dots) or right click on a song and select “Add to playlist” and choose a playlist.

Playlist name ideas

“Love Songs” for those romantic, candlelit evenings.
“Dance Music” for discos, dancing or parties.
“Relaxing Music” or something like that when its time to sit back and relax.

Listening to your music

Now you are ready to listen to your music.

What you will need to listen to your music

Any signed in device such as

  1. A computer opened on the https://music.google.com web site
  2. A tablet or smartphone with the Google Play Music app
  3. A Google Home or Nest mini
  4. Google Chromecast connected to a monitor or TV
  5. A good quality speaker or pair of speakers connected by cable or bluetooth to the computer, tablet, smartphone, monitor or TV.

Now simply give a voice command using the Google Assistant to play your music

E.G. “Ok Google, play [song name] [album name] [on [name of chromecast device]]”
Further commands you can use:
“Ok Google, play next”
“Ok Google, volume down”
“Ok Google, volume up”
“Ok Google, set volume to [number 1 – 10]”

Would you like help setting up your music?

We charge £1 per CD to upload to your Google Play Music account

We’ll upload all songs from each CD and it will then be up to you to delete the songs you don’t like and create your own playlists.

Google Play Music
Please enter your first name
Please enter your surname
Enter a company name (optional)
Address
Street
Suburb
City
County
Postal Code
Please complete ALL address fields
Please enter a telephone number
Please enter an email address
Upload CD to Google Play Music

CD Upload (each): £ 1.00

Please count all the CD's and enter the total here
Total

Collection and Delivery
Bristol and Bath areas only
Leave the above un-ticked if you are able to bring the CD's to Martin's HelpDesk
£
Terms and Conditions...>
Please allow 24 hours per 100 CD's or part thereof.
We will email you to confirm your drop off day and time option.

  • The CD's supplied must be standard audio CD's or CD's with MP3 files. All other CD's will be omitted
  • You must supply us with your Google account details for us to perform the process. We will discard the account records when the job has been completed
  • Removal of unwanted tracks and creating playlists can be done by logging into your Google Play Music account

**This must be taken within 2 weeks from date of payment. You will receive an email requesting to book a time and date. If no response is received within two weeks your payment will be forfeited.

Please provide us with 2 date and time options within the next 2 weeks
:
:

PayPal Acceptance Mark

cheque

Pay by cheque
Please make your cheque payable to:
Martin's HelpDesk
and post your cheque to:
Martin's HelpDesk
156 Hungerford Road
Brislington
Bristol
BS4 5EZ


Enter the Card No, Expiry Month / Year, last 3 digits (CVC) on the back of your card and postal code if prompted.
This payment method adheres to the new European regulation introduced on 14 September 2019 which mandates Strong Customer Authentication (SCA) for online card payments. ...More Info
Essentially SCA may prompt you for additional authentication to complete a payment.
Sending

Filed Under: Mobile, Projects

10 February, 2020 by Martin Vines Leave a Comment

What if I lose my Phone?

No matter how conscientious you might be, losing a phone can happen to anybody.

Your phone can go missing or even stop working! This can be due to:

  1. Theft
  2. Loss
  3. Breakage or break down
  4. …or maybe you just left it behind somewhere

How do you know that your data is safe, that no-one else can access your data and how to recover your phone?

Fear not – if you just spend a few minutes getting your ducks in a row you need worry no more.

  • Lock your phone
  • Store your data in the cloud
  • Setup “Find my Device”

Make sure your phone is locked

Most important is to lock your phone. Once you have set up your phone locking security your phone will automatically lock after a predefined time and/ or action.

You can then unlock your phone in one of many ways (some or all will be supported on your phone).

  • Pin Code
  • Pattern
  • Face-unlock
  • Fingerprint sensor
  • Password

Make sure you are storing your data in the cloud

Your data comprises:

  • Contacts
  • Calendar
  • Photos
  • Documents such as boarding tickets, train and bus travel, Notes, Reminders etc.
  • WhatsApp conversations
  • Text messages and call history

Every device should be linked to either your Google or iCloud account and also to your phone manufacturer cloud account if available. This will assist in Find my Device as detailed below.

Find my Device

You should never need to turn your device off. By this I mean “power down”. If your device is powered down you will not be able to find it or perform any of the operations below.

Furthermore, the following switches need to be set to “on”:

  • Mobile Data
  • Location
  • Sync

The above switches can be left to “on” at all times. I would also leave the Wi-Fi setting to “on” as well.

Recovery

Firstly you can try calling your own number from another phone or mobile. If answered, a reasonable person will help you to retrieve your phone.

Finding your device is done using another device such as a computer.

Using a web browser, log into your account and use the “Find a lost device” feature.

Your logged in devices will appear here in a list where you can:

Google Account

  • Ring
  • Locate
  • Lock (and leave a message to the finder)
  • Erase device
  • Sign out

Samsung Account

  • Lock (and leave a message to the finder) or Lock and Power off
  • Erase Data
  • Backup
  • Retrieve calls/Messages
  • Unlock
  • Extend Battery Life
  • Set Guardian

You could contact your mobile operator to disable your SIM card and redirect your calls to another number.

Once you have gone through the above steps you will have peace of mind that your data is secure. You are now ready to purchase or use another device at any time. Your contacts, calendar, apps and data will be just appear just as before!

Would you like us to set this up for you?

Please visit our Smart Phone Setup Page and select a plan that suits you.

Filed Under: Mobile

5 October, 2018 by Martin Vines 5 Comments

Samsung Galaxy Tab S4

The recently released Samsung Galaxy Tab S4 has been discovered as a versatile tablet/ laptop combination. Although it is tiny as a laptop here is a brief guide on using it in laptop mode with the keyboard cover accessory.

These notes may also apply to users of other Samsung Devices that utilize the Dex Mode.

Quick Links to the content below

Orientation
Screen Modes
Samsung Dex
Email
Desktop Shortcuts
Keyboard and Dictation
Microsoft Office
Forced Restart

Orientation

Screen Modes

  1. Samsung DeX
    (Desktop eXperience)
    Samsung DeX provides a more desktop like experience especially when the tablet is docked into the keyboard cover. You get a screen layout that closely resembles your Windows desktop. When docked the tablet can be set to automatically switch to Samsung DeX.
    Samsung DeX is always in Landscape mode.
    To view properly, rotate the tablet to the landscape orientation. (It will already be rotated correctly if docked onto the keyboard).
  2. Normal
    This mode shows the normal screen layout in both Landscape and Portrait orientations.

Switching between Samsung DeX screen layout mode and Normal screen layout mode

Whilst the tablet is in Samsung DeX mode:
Tap on the △. This is found in system tray area at the bottom right to bring up the Quick Settings menu. Tap on the last item “Samsung DeX”.

Whilst the tablet is in Normal mode:
Swipe down from the top of the screen twice (or once using two fingers). Find the “Samsung DeX” switch and tap it once.

Samsung DeX

The Samsung DeX Desktop – explained

KeyBoard Shortcuts

These keyboard shortcuts work while the tablet is connected to the keyboard cover.

Home 🔍+⤶ Enter
Back 🔍+Backspace
Running apps Alt+⭾Tab
Notifications 🔍+N
Keyboard shortcuts 🔍+/
Switch languages ↑ Shift + Space
Lock screen 🔍+L
All apps 🔍
Browser 🔍+B
Contacts 🔍+C
Email 🔍+E
Music 🔍+P

TAB S4

Windows (in Samsung DeX mode)

Just like on your desktop computer, all open applications are displayed in the task bar at the bottom of the screen. The selected application will be open in a window with three icons in the top right of the application. These icons work in the same way as applications on your Windows desktop.

  1. Minimise
  2. Maximise or Resize
  3. Close

Note: not all Android apps allow resizing of their respective window.

Email

All email accounts can be setup in the Samsung Email App

You can open the email app in two different ways:

  1. Find and tap on the email app icon 
  2. Use the keyboard shortcut 🔍+E (Whilst in Samsung DeX screen layout mode)

The email app has three columns

  1. Column 1 contains the email accounts and folders.
  2. Column 2 contains the email items for the selected email account or folder in column 1.
  3. Column 3 displays the email content of the selected email in column 2.

To resize the columns put your finger on the vertical line between two columns and drag left or right.

Email Actions

Quick actions in column 2 (middle column)

In the email items column (column 2) put your finger on an email and drag left or right as follows:

  • To Delete an Email: Drag the email from right to left
  • To Reply, Move, or mark an email as Read: Drag the email from left to right and choose the desired action.

Compose an Email: Tap the round orange dot at the bottom of the email list column (middle column).

Quick actions in Column 3 (right column)

  • copy
  • reply
  • reply to all
  • forward
  • delete

Create Desktop Shortcuts to most used web sites

You can access your most used web pages directly from the home screen:

  1. Visit the web page
  2. Tap the 3 dots on the top right
  3. Tap “Add to Home screen”

Shortcuts are then added to the Desktop.

Using Google Chrome

If the desktop shortcut is created in Google Chrome, tapping on either shortcut will open that page into its own tab in the Chrome browser app.

Using Microsoft Edge

If the desktop shortcut is created in Microsoft Edge, tapping on either shortcut will open that page into its own new window in the Edge browser app.

Keyboard and voice input/ dictation

Dictation is activated via the microphone icon in the on-screen keyboard.

The on-screen keyboard can be set to be displayed when any application that requires keyboard input is launched. (This setting is found in the Samsung DeX settings).

If you have the tablet docked into the keyboard cover, you can simply get the onscreen keyboard out the way with the “x” at the top right of the onscreen keyboard. To bring the on-screen keyboard up again, tap inside the text input area on the screen.

Tap on the microphone icon on the on-screen keyboard to start dictation immediately. Thereafter press the centre Tap to speak icon to pause or resume. If you don’t manage the Tap to speak properly, unwanted text from background noise and conversation will populate your typing area unnecessarily.

Want to punctuate your typed text whilst speaking? Try these commands during your dictation.

  • Period = period (.)
  • Comma = comma (,)
  • Question mark = question mark (?)
  • Exclamation or exclamation point = exclamation point (!)
  • Apostrophe = apostrophe (‘)
  • Enter or new line = moves to a new line
  • New paragraph = new paragraph
  • Tab key = tab
  • Colon = colon (:)
  • Dash = dash (-)
  • Ellipsis or dot dot dot = ellipsis (…)
  • Ampersand = ampersand (&)
  • Asterisk = asterisk (*)
  • At sign = at sign (@)
  • Backslash = backslash (\)
  • Forward slash = forward slash (/)
  • Open bracket = open bracket ([)
  • Close bracket = closed bracket (])
  • Open parenthesis = open parenthesis (()
  • Close parenthesis = close parenthesis ())

Microsoft Office Apps

Included with the tablet are the Microsoft Office suite apps: Word, Excel and PowerPoint. You can only view documents in these apps.

The tablet has a screen size of 10.5 inches. Microsoft has set a limit of offering the Microsoft Office Suite apps for mobile devices for free up to a screen size of 10.1 inches.

…More info

Because the tablet size is 10.5 inches, you are not able to create or edit documents without a valid Office 365 subscription.

Forced Restart

You may find yourself in a situation where your TAB S4 freezes or can’t do anything, or you may notice that the time is not changing to the current time. Try a Forced Reboot. Here’s how:

At the same time press and hold BOTH the Power Button AND the Volume Down button at the same time for more than 7 seconds. The tablet will then restart and hopefully everything will be normal again!

…More Info

Mobile Setup

Martin’s HelpDesk can help users get the best out of their phone or tablet. With a proper setup your phone can facilitate your everyday activities. We provide a custom setup to match your lifestyle including work, travel, sports and leisure.

https://martinshelpdesk.com/smartphone

Filed Under: Mobile

24 September, 2018 by Martin Vines

Protect your Device with your Google Account

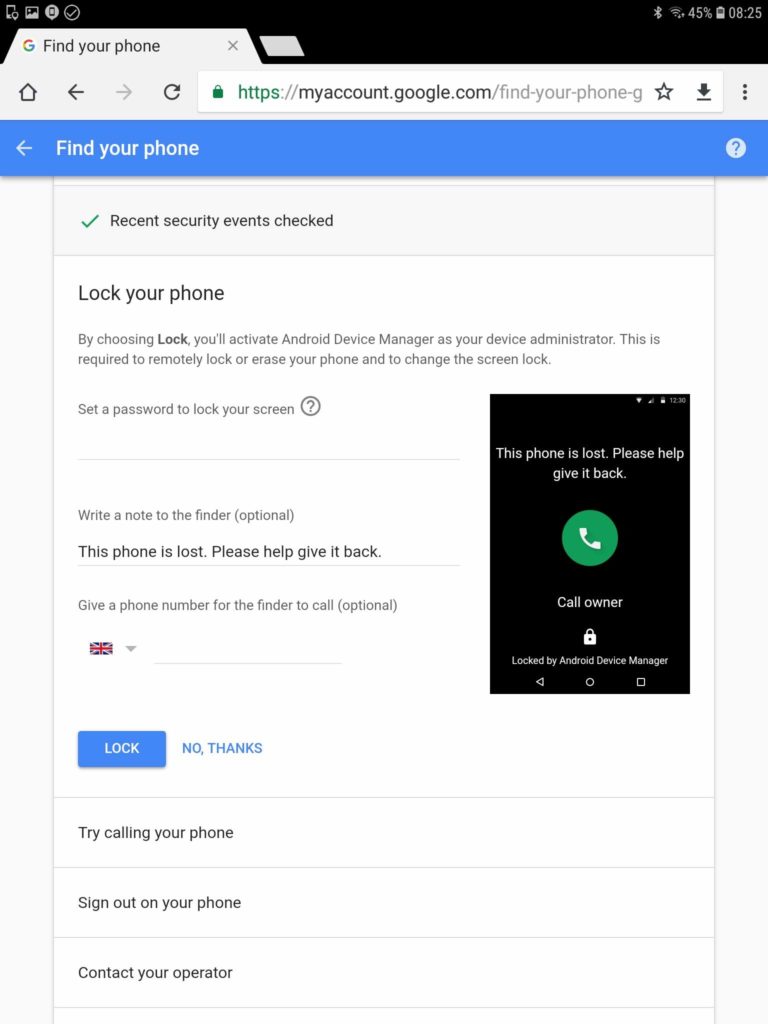
If you own an Android device, it is important to set up your Google Account so that you and your phone are protected in the event of an emergency, theft or loss.

Account linked to your phone manufacturer

Your phone manufacturer may offer alternate features to those available in your Google Account.

For example: with a Samsung account you will get the additional options of retrieving your call log, perform a new backup, disable the device from powering off etc.

I recommend getting both the Google and the Manufacturer specific accounts setup correctly.

Please see my other article on Setting up a Samsung Account called “Why you need a Samsung Account”:

Why you need a Samsung Account

Google Account

*** During the initial setup of your phone you would have already signed in with a Google Account, providing you access to your Google Calendar and your Google Contacts. ***

Here is how it is done!

  1. Tap Google.
  2. Tap Google Account.
  3. Under Home, Security issues found

Third-party access

These are Apps with account access and less secure app access.

If you access your Google Account with a product that is deemed as “less secure” then you should set the “Allow less secure apps” to be ON.

A less secure app can be a product such as Windows Live Mail or Microsoft Outlook. If you want to continue to use a less secure product to access your Google account then you must leave “Allow less secure apps” to be ON.

Google Play Protect

  1. In “Your devices”, Turn on app & device protection on your …‘Phone name’.
  2. “Turn on Play Protect?” tap ACCEPT
    Google Play Protect checks your device and prevents or warns about potential harm.

Sign-in & recovery

Set up your recovery email address and recovery phone number. This information helps you to get back into your account if you forget your password or cannot access your account.

Services

Backup

Backup is one of essential services, should your phone be lost, stolen or damaged.

Select Backup and check that the following is backed up.

Backup to Google Drive is set to “On”.

Active backups should be as follows:

  • App data
  • Contacts
  • Device Settings
  • Photos & Videos

To make any changes:

  1. Tap Settings
  2. Tap Cloud and accounts
  3. Tap Accounts
  4. Tap your Google account (next to the Google Symbol “G”)
  5. Tap Sync account
  6. Switch individual sync items on or off as required.

Security

Find My Device

Tap Find My Device

Set the switch to “On”

This will allow your device to be found when you log into the web at:

https://android.com/find

From the Google Find my Device screen you can:

  1. Locate the phone on a Google map
  2. Play a Sound
  3. Enable Secure and Erase
    (I found that this feature did not work on my device)

Find Your Phone

Find your Phone

This is the preferred method.

https://myaccount.google.com/

Click on Find Your Phone (4th item in the list).

Go through the verification TEST by typing in your Google password.

You now have a collection of options depending on the circumstances of the loss.

Find your phone includes the following features:

  1. Ring
    Rings the phone for 5 minutes
  2. Locate
    Locates the phone on a Google map

    (Map distorted for privacy reasons)
  3. Lock your phone
    Whether or not you have locked your phone, you can now do so with a password, enter a contact no and a message.

    1. Set a password (whether or not you already have one)
    2. Send a message to the phone lock screen
    3. Provide a phone number for the finder to call (provide an alternate number to your mobile number)
      The phone will turn on and the following will now appear on the screen of your phone:
  4. Sign out of your phone
  5. Consider erasing your device (this provides an ERASE button).
    This erase procedure may also erase the contents on your memory card. After an erase you will no longer have remote access to your phone.

The finder is still able to access the Emergency information (ICE contacts and personal medical information) by tapping EMERGENCY. (See https://martinshelpdesk.com/ice).

Once retrieved the owner will have the ability to enter a PIN or password and unlock the phone.

Mobile Phone Setup

Martin’s HelpDesk can help users get the best out of their phone. With a proper setup your phone can facilitate your everyday activities. We provide a custom setup to match your lifestyle including work, travel, sports and leisure.

https://martinshelpdesk.com/smartphone

Filed Under: Mobile

  • 1
  • 2
  • Next Page »

View All Testimonials
As always Martin did an excellent job in sorting out my email signatures. Not only does it look very professional, but all the links work and I didn’t even have to leave my office to get it sorted.
If …More you and your computer are in a fight, Martin’s Helpdesk will definitely put it right!

— Inge Dowden

Recent Posts

  • FreeFileSync 2 January, 2023
  • Google Photos 29 January, 2021
  • Emergency on Huawei Phone 1 July, 2020

Follow Us On…

Follow us on FaceBook   Follow us on LinkedInFollow us on Twitter

Contact Us

Call 0117 911 8064
Martin's HelpDesk
35 Blenheim Drive
Filton
Bristol
BS34 7AX

Privacy Policy

Copyright ©Martin's HelpDesk 2018. Developed and Designed by martin's HelpDesk using the Genesis Framework and Executive Pro Theme