Martin's HelpDesk

  • Home
  • About
  • Support
  • Services
    • Web Listings →
      • Create a Forum
      • Create a Job Listing
      • Create a Property Listing
    • IT Services →
      • IT Care Plans
      • Backup
      • Smart Phone Setup
      • ESET Security
      • Email Security
      • Job Tracking
    • Web Services →
      • Domain and Hosting
      • Web Development
      • Web Listings
      • eCommerce
  • Testimonials
  • News
  • Contact

1 October, 2019 by Martin Vines Leave a Comment

Integrate your Business Calendar in Google and Outlook

Without Google G Suite, it is still possible to integrate your business calendar and appointments within your private Google Account.

Requirements:

  • Google Account
  • Microsoft Outlook

Microsoft Outlook (part of Microsoft Office)

Create an additional Calendar to your normal Outlook Calendar and give it the name of your business. Create an additional Calendar in your Google Account and give it the name of your business.

Install gSyncit

gSyncit is an Outlook plugin that enables the syncing of Outlook calendars, contacts, notes, and tasks with your Google account.

The installation of gSyncit makes sure that whatever is added or changed for an appointment or a contact is also reflected across all Google connected devices and applications. This then updates your Outlook, your mobile device (phone and /or tablet) and your Google account on the Web.

(gSyncit also works with other popular online accounts too).

Purchase and Install gSyncIt. gSyncit cost $19.99.

(Around every second year, a full version upgrade cost $12.99.)

In the gSyncit settings, Google Sync, Calendar Sync, setup gSyncit to synchronise

  1. your personal calendar
  2. your business calendar

I suggest you also setup to synchronise Contacts in Contact Sync.

Lastly, in Application Settings, Sync Options, tick Enable automatic synchronization.

How to create a new calendar appointment with attendees

It is useful for your attendees to accept appointments you make and have these appointments automatically added to their calendar. This ensures that you both have the same information about the subject, date, time and location of the appointment.

In Outlook, go to your business calendar

Create an event as normal

Click Invite Attendees

This will add a To… field where you can type email addresses of the attendees.

Enter Subject, Location Start and End time (including the dates) and enter some details in the appointment body.

Note: The subject and appointment details will also appear for the attendees, so make it relevant for them.

Click Send

The following warning message will appear

Click Yes

A notification is received when an attendee accepts an appointment:

In your Outlook Calendar the meeting will have a note at the top: No responses have been received for this meeting. This follows the warning received previously about responses not being tallied.

Rest assured you still have the notification message in your Inbox that the meeting has been accepted.

Would you like us to set this up for you?

Please submit an installation service request or a support request and we’ll get back to you to arrange an on-line / desktop sharing consultation. We estimate the setup procedure would take us just half an hour.

Filed Under: Projects

5 October, 2018 by Martin Vines 5 Comments

Samsung Galaxy Tab S4

The recently released Samsung Galaxy Tab S4 has been discovered as a versatile tablet/ laptop combination. Although it is tiny as a laptop here is a brief guide on using it in laptop mode with the keyboard cover accessory.

These notes may also apply to users of other Samsung Devices that utilize the Dex Mode.

Quick Links to the content below

Orientation
Screen Modes
Samsung Dex
Email
Desktop Shortcuts
Keyboard and Dictation
Microsoft Office
Forced Restart

Orientation

Screen Modes

  1. Samsung DeX
    (Desktop eXperience)
    Samsung DeX provides a more desktop like experience especially when the tablet is docked into the keyboard cover. You get a screen layout that closely resembles your Windows desktop. When docked the tablet can be set to automatically switch to Samsung DeX.
    Samsung DeX is always in Landscape mode.
    To view properly, rotate the tablet to the landscape orientation. (It will already be rotated correctly if docked onto the keyboard).
  2. Normal
    This mode shows the normal screen layout in both Landscape and Portrait orientations.

Switching between Samsung DeX screen layout mode and Normal screen layout mode

Whilst the tablet is in Samsung DeX mode:
Tap on the △. This is found in system tray area at the bottom right to bring up the Quick Settings menu. Tap on the last item “Samsung DeX”.

Whilst the tablet is in Normal mode:
Swipe down from the top of the screen twice (or once using two fingers). Find the “Samsung DeX” switch and tap it once.

Samsung DeX

The Samsung DeX Desktop – explained

KeyBoard Shortcuts

These keyboard shortcuts work while the tablet is connected to the keyboard cover.

Home 🔍+⤶ Enter
Back 🔍+Backspace
Running apps Alt+⭾Tab
Notifications 🔍+N
Keyboard shortcuts 🔍+/
Switch languages ↑ Shift + Space
Lock screen 🔍+L
All apps 🔍
Browser 🔍+B
Contacts 🔍+C
Email 🔍+E
Music 🔍+P

TAB S4

Windows (in Samsung DeX mode)

Just like on your desktop computer, all open applications are displayed in the task bar at the bottom of the screen. The selected application will be open in a window with three icons in the top right of the application. These icons work in the same way as applications on your Windows desktop.

  1. Minimise
  2. Maximise or Resize
  3. Close

Note: not all Android apps allow resizing of their respective window.

Email

All email accounts can be setup in the Samsung Email App

You can open the email app in two different ways:

  1. Find and tap on the email app icon 
  2. Use the keyboard shortcut 🔍+E (Whilst in Samsung DeX screen layout mode)

The email app has three columns

  1. Column 1 contains the email accounts and folders.
  2. Column 2 contains the email items for the selected email account or folder in column 1.
  3. Column 3 displays the email content of the selected email in column 2.

To resize the columns put your finger on the vertical line between two columns and drag left or right.

Email Actions

Quick actions in column 2 (middle column)

In the email items column (column 2) put your finger on an email and drag left or right as follows:

  • To Delete an Email: Drag the email from right to left
  • To Reply, Move, or mark an email as Read: Drag the email from left to right and choose the desired action.

Compose an Email: Tap the round orange dot at the bottom of the email list column (middle column).

Quick actions in Column 3 (right column)

  • copy
  • reply
  • reply to all
  • forward
  • delete

Create Desktop Shortcuts to most used web sites

You can access your most used web pages directly from the home screen:

  1. Visit the web page
  2. Tap the 3 dots on the top right
  3. Tap “Add to Home screen”

Shortcuts are then added to the Desktop.

Using Google Chrome

If the desktop shortcut is created in Google Chrome, tapping on either shortcut will open that page into its own tab in the Chrome browser app.

Using Microsoft Edge

If the desktop shortcut is created in Microsoft Edge, tapping on either shortcut will open that page into its own new window in the Edge browser app.

Keyboard and voice input/ dictation

Dictation is activated via the microphone icon in the on-screen keyboard.

The on-screen keyboard can be set to be displayed when any application that requires keyboard input is launched. (This setting is found in the Samsung DeX settings).

If you have the tablet docked into the keyboard cover, you can simply get the onscreen keyboard out the way with the “x” at the top right of the onscreen keyboard. To bring the on-screen keyboard up again, tap inside the text input area on the screen.

Tap on the microphone icon on the on-screen keyboard to start dictation immediately. Thereafter press the centre Tap to speak icon to pause or resume. If you don’t manage the Tap to speak properly, unwanted text from background noise and conversation will populate your typing area unnecessarily.

Want to punctuate your typed text whilst speaking? Try these commands during your dictation.

  • Period = period (.)
  • Comma = comma (,)
  • Question mark = question mark (?)
  • Exclamation or exclamation point = exclamation point (!)
  • Apostrophe = apostrophe (‘)
  • Enter or new line = moves to a new line
  • New paragraph = new paragraph
  • Tab key = tab
  • Colon = colon (:)
  • Dash = dash (-)
  • Ellipsis or dot dot dot = ellipsis (…)
  • Ampersand = ampersand (&)
  • Asterisk = asterisk (*)
  • At sign = at sign (@)
  • Backslash = backslash (\)
  • Forward slash = forward slash (/)
  • Open bracket = open bracket ([)
  • Close bracket = closed bracket (])
  • Open parenthesis = open parenthesis (()
  • Close parenthesis = close parenthesis ())

Microsoft Office Apps

Included with the tablet are the Microsoft Office suite apps: Word, Excel and PowerPoint. You can only view documents in these apps.

The tablet has a screen size of 10.5 inches. Microsoft has set a limit of offering the Microsoft Office Suite apps for mobile devices for free up to a screen size of 10.1 inches.

…More info

Because the tablet size is 10.5 inches, you are not able to create or edit documents without a valid Office 365 subscription.

Forced Restart

You may find yourself in a situation where your TAB S4 freezes or can’t do anything, or you may notice that the time is not changing to the current time. Try a Forced Reboot. Here’s how:

At the same time press and hold BOTH the Power Button AND the Volume Down button at the same time for more than 7 seconds. The tablet will then restart and hopefully everything will be normal again!

…More Info

Mobile Setup

Martin’s HelpDesk can help users get the best out of their phone or tablet. With a proper setup your phone can facilitate your everyday activities. We provide a custom setup to match your lifestyle including work, travel, sports and leisure.

https://martinshelpdesk.com/smartphone

Filed Under: Mobile

24 September, 2018 by Martin Vines

Protect your Device with your Google Account

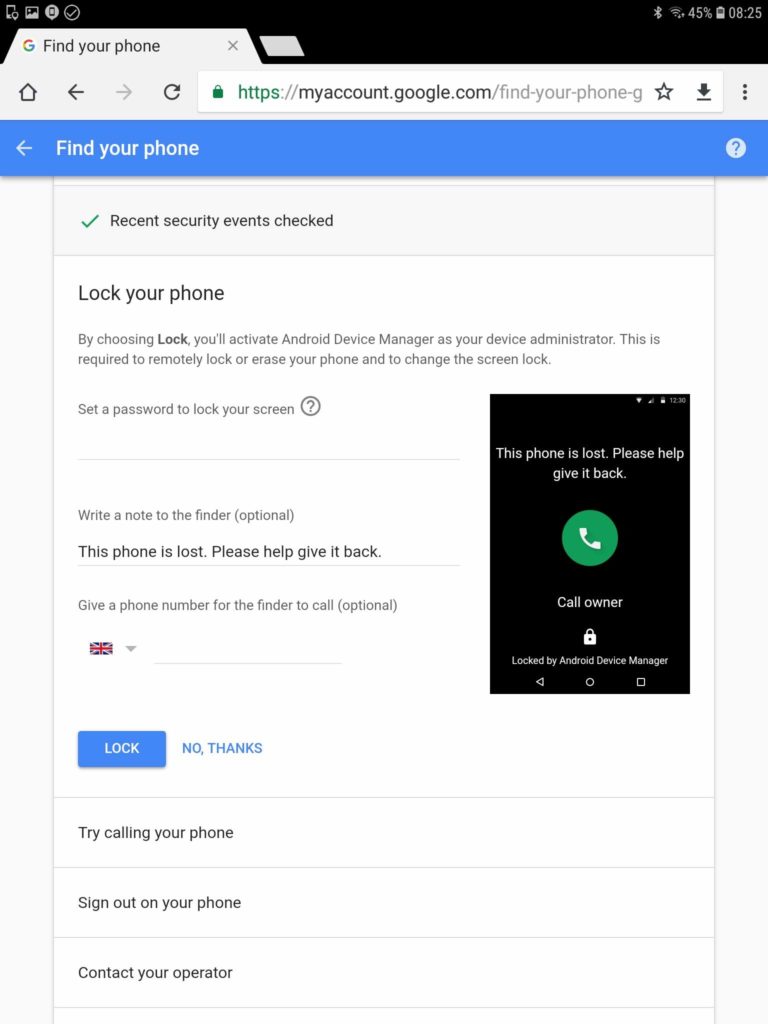
If you own an Android device, it is important to set up your Google Account so that you and your phone are protected in the event of an emergency, theft or loss.

Account linked to your phone manufacturer

Your phone manufacturer may offer alternate features to those available in your Google Account.

For example: with a Samsung account you will get the additional options of retrieving your call log, perform a new backup, disable the device from powering off etc.

I recommend getting both the Google and the Manufacturer specific accounts setup correctly.

Please see my other article on Setting up a Samsung Account called “Why you need a Samsung Account”:

Why you need a Samsung Account

Google Account

*** During the initial setup of your phone you would have already signed in with a Google Account, providing you access to your Google Calendar and your Google Contacts. ***

Here is how it is done!

  1. Tap Google.
  2. Tap Google Account.
  3. Under Home, Security issues found

Third-party access

These are Apps with account access and less secure app access.

If you access your Google Account with a product that is deemed as “less secure” then you should set the “Allow less secure apps” to be ON.

A less secure app can be a product such as Windows Live Mail or Microsoft Outlook. If you want to continue to use a less secure product to access your Google account then you must leave “Allow less secure apps” to be ON.

Google Play Protect

  1. In “Your devices”, Turn on app & device protection on your …‘Phone name’.
  2. “Turn on Play Protect?” tap ACCEPT
    Google Play Protect checks your device and prevents or warns about potential harm.

Sign-in & recovery

Set up your recovery email address and recovery phone number. This information helps you to get back into your account if you forget your password or cannot access your account.

Services

Backup

Backup is one of essential services, should your phone be lost, stolen or damaged.

Select Backup and check that the following is backed up.

Backup to Google Drive is set to “On”.

Active backups should be as follows:

  • App data
  • Contacts
  • Device Settings
  • Photos & Videos

To make any changes:

  1. Tap Settings
  2. Tap Cloud and accounts
  3. Tap Accounts
  4. Tap your Google account (next to the Google Symbol “G”)
  5. Tap Sync account
  6. Switch individual sync items on or off as required.

Security

Find My Device

Tap Find My Device

Set the switch to “On”

This will allow your device to be found when you log into the web at:

https://android.com/find

From the Google Find my Device screen you can:

  1. Locate the phone on a Google map
  2. Play a Sound
  3. Enable Secure and Erase
    (I found that this feature did not work on my device)

Find Your Phone

Find your Phone

This is the preferred method.

https://myaccount.google.com/

Click on Find Your Phone (4th item in the list).

Go through the verification TEST by typing in your Google password.

You now have a collection of options depending on the circumstances of the loss.

Find your phone includes the following features:

  1. Ring
    Rings the phone for 5 minutes
  2. Locate
    Locates the phone on a Google map

    (Map distorted for privacy reasons)
  3. Lock your phone
    Whether or not you have locked your phone, you can now do so with a password, enter a contact no and a message.

    1. Set a password (whether or not you already have one)
    2. Send a message to the phone lock screen
    3. Provide a phone number for the finder to call (provide an alternate number to your mobile number)
      The phone will turn on and the following will now appear on the screen of your phone:
  4. Sign out of your phone
  5. Consider erasing your device (this provides an ERASE button).
    This erase procedure may also erase the contents on your memory card. After an erase you will no longer have remote access to your phone.

The finder is still able to access the Emergency information (ICE contacts and personal medical information) by tapping EMERGENCY. (See https://martinshelpdesk.com/ice).

Once retrieved the owner will have the ability to enter a PIN or password and unlock the phone.

Mobile Phone Setup

Martin’s HelpDesk can help users get the best out of their phone. With a proper setup your phone can facilitate your everyday activities. We provide a custom setup to match your lifestyle including work, travel, sports and leisure.

https://martinshelpdesk.com/smartphone

Filed Under: Mobile

21 September, 2018 by Martin Vines 16 Comments

Why you need a Samsung Account

If you own a Samsung device, setting up Samsung Account can help you in the event of an emergency, theft or loss. You will also be able to restore all your data to a replacement Samsung device.

I recommend getting both the Manufacturer specific account (in this case it is Samsung) and your Google account setup correctly.

Please see my other article on Setting up a Google Account called “Protect your Device with your Google Account”.

Protect your Device with your Google Account

Setup your Samsung Account on your Samsung device. This will give you access to numerous Samsung Services including:

  1. Samsung Pay
  2. Bixby
  3. Samsung Cloud Storage
  4. Find my Mobile
  5. *Samsung Notes
  6. *Samsung Health

*Note: If you change or upgrade to a non Samsung device then your data stored in Samsung Notes and Samsung Health will be lost as these apps will not be compatible with your new device.

I now use these alternative apps:

    • Microsoft One Note (requires a Microsoft Account)
    • Sports Tracker Premium (premium maps and no adds)
      Sport Tracker Premium costs £14.99 per year (in my region)

Create a Samsung Account

  1. Open Settings.
  2. Tap Cloud and accounts.
  3. Tap Accounts.
  4. Tap Add account.
  5. Tap Samsung account.
  6. Tap CREATE ACCOUNT.
  7. Enter your email and a password.
  8. Tap NEXT.
  9. Select terms and conditions, and tap AGREE.

Backup your Phone and Sync your Data

  1. Open Settings
  2. Tap Cloud and Accounts
  3. Tap Samsung Cloud
  4. Tap the 3 dots in the upper right corner
  5. Tap Settings
  6. Tap Sync Settings
  7. Select the items to be backed up

Use the same procedure for Auto backup settings

Find my Mobile

Visit the following Web Site from any device and login: https://findmymobile.samsung.com

Once you are logged in, a web page will show your devices with the location of the selected device on a zoomable map:

(The map has been distorted for privacy reasons)

Find My Mobile combines all the services into one to perform the following actions:

  • Ring
  • Lock and Lock Power Off
  • Erase data
  • Back up
  • Retrieve calls/messages
  • Unlock
  • Extend battery life
  • Set guardian

Google has a similar offering with 2 services: Find your Phone and Google Find My Device.

Please see my separate article on Google

There is one main difference – Samsung Find My Mobile can retrieve your call log from your phone. (When using the feature Retrieve calls/messages – only my call log was displayed and no messages).

Lock

Whether or not you have locked your phone, you can now do so. Set up a PIN number, enter a contact no as well as a message.

The following will now appear on lock screen of the lost phone:

The finder is still able to access the Emergency information (ICE contacts and personal medical information) by tapping EMERGENCY CALL. (See https://martinshelpdesk.com/ice).

Once retrieved the owner will have the ability to enter a PIN and unlock the phone.

Lock Power off

This disables the “Power off” function of the phone, so that it stays on and connected.

Back up

Backup gives you the opportunity to do a final back up (as long as the phone is still powered on and has an internet connection). The following items will be backed up:

·         Phone log·         Messages

·         Contacts (on phone)

·         Calendar (on phone)

·         Clock, Settings

·         Home Screen

·         Apps

·         Documents

·         Voice Recorder·         Music

·         Calendar

·         Contacts

·         Gallery

·         Memo

·         Samsung Internet

·         Samsung Notes

These can then be restored to a new (Samsung) phone that has signed in with the same Samsung Account.

Note: The Contacts and Calendar items can be stored in various locations – specifically on your phone, in your Google Account or in your Samsung Account. It is best to keep everything in one place (i.e. your Google Account).

Retrieve calls/messages

Up to the last 50 calls are retrieved. (When I used this there were no retrieved messages)

Unlock

Provides you a remote unlock of your phone should you forget your unlock method. It will delete all stored unlock procedures on the phone. You will need your Samsung account password to confirm.

Set Guardian

Sets designated guardians to remotely perform the following:

  • Locate your device
  • Activate Emergency Mode
  • Ring device

After agreeing, you then need click to Set guardian a second time and enter up to three new guardian’s Samsung account information with an access duration of “always” or set a “custom date range”.

Martin’s HelpDesk can help users get the best out of their phone. With a proper setup your phone can facilitate your everyday activities. We provide a custom setup to match your lifestyle including work, travel, sports and leisure.

https://martinshelpdesk.com/smartphone

Filed Under: Mobile

19 September, 2018 by Martin Vines Leave a Comment

My 24 hours without a Smartphone

It was a  working week day and I’d left my smartphone1 at my girlfriend’s house and would only be able to retrieve it the following morning.

Fortunately, I had left my phone connected to a power bank2. It was also connected to the wireless internet in the property.

How would I carry on working and keep in touch with friends and clients without my SmartPhone?

Amazingly I found that I still had remote access to:

  1. My text messages
  2. Missed calls
  3. Voicemail
  4. Calls to and from my VoIP3 account

As a Virgin Mobile customer, there was no way to remotely forward incoming calls to another number.

Here is how it all worked…

Text Messages and Missed Calls

I have been using an app called MySMS4 on my phone since 2015. This is a text messaging app that replaces the standard text messaging app on your phone. It costs about $10 per year.

With MySMS, I was very relieved to find that I could still send and receive text messages. Using the MySMS companion app for a tablet and an extension for Chrome I was able to see continue sending and receiving text messages as well as see my mobile phone call log. Seeing the missed calls I could decide whether I should send a text message, return the call or ignore it.

Phone Calls with Voice over IP (VoIP)

I have a Voice over IP number from VoIPTalk5.  Back in 2008 I took out this subscription with a Bristol phone number at a cost of £6 per month. It includes 1,000 minutes to landlines. Being already setup up in an app on my smartphone, I needed to set it up on my tablet and computer.

I quickly installed the free app called Zoiper6 on both my tablet and computer and configured the VoipTalk account in each app. Immediately, I was able to make and receive calls.

VoiceMail7

Using my VoIPTalk account I could now check my voice mail by calling my mobile phone number. The procedure (for Virgin Mobile) is to press * when the voicemail greeting starts then enter the voicemail PIN (setup in the voicemail settings), then press #.

References

  1. SmartPhone – an internet connected phone that is linked to an App store to enable the installation of programs providing extra functionality over normal phone calls and text messages.
  2. Power bank – a rechargeable battery pack designed to provide backup power and recharge a phone.
  3. VoIP – Voice over Internet Protocol. A technology that relays voice (as well as video and text) over an internet connection, typically by dialling a local national number or a toll free number.
  4. MySMS – A text messaging app for an Android smartphone. https://www.mysms.com/
  5. VoipTalk – A VoIP provider. Rent a number so that your internet connected device will ring wherever in the world you might be.
  6. Zoiper – A telephone app for a smartphone, tablet or desktop computer enabling the installation of a VoIP account. https://www.zoiper.com/
  7. VoiceMail – Voice message service used when you are unable to answer your phone.

Custom Setup

I provide a custom setup service for both Android and Apple smartphones so you can release the full potential of your phone. Hopefully in the process you will save time, get more things done and be better connected.

SmartPhone Setup

Filed Under: Uncategorized

  • « Previous Page
  • 1
  • 2
  • 3
  • 4
  • Next Page »

Recent Posts

  • FreeFileSync
  • Google Photos
  • Emergency on Huawei Phone
  • Google Music
  • What if I lose my Phone?

Categories

  • LogYourJob
  • Mobile
  • Operating Systems
  • Projects
  • Security
  • Uncategorized

Recent Comments

  • Martin Vines on FreeFileSync
  • Vladimir Shulyaker on FreeFileSync
  • Martin Vines on Why you need a Samsung Account
  • Julia on Why you need a Samsung Account
  • Martin Vines on Why you need a Samsung Account

Archives

  • January 2023
  • January 2021
  • July 2020
  • April 2020
  • February 2020
  • October 2019
  • October 2018
  • September 2018
  • June 2018
  • April 2018
  • September 2017
  • January 2017
  • January 2016
  • October 2015
  • July 2015

View All Testimonials
Martin configured our new laptops to our server and enabled wireless networking. Installed and configured Good Sync backup software to back-up to our remote storage. installed and configures Safecom …More portable wireless storage and printserver to the network and configued the printserver to work with a HP deskjet printer. We have been working with this system for a week now and there have been no connection or printing issues, everything works fine. Great work we have more lined up for you soon!!!

— Mark Hutton

Contact Us

Call 0117 911 8064
Martin's HelpDesk
26 Woodland Avenue
Kingswood
Bristol
BS15 1PZ

Recent Posts

  • FreeFileSync 2 January, 2023
  • Google Photos 29 January, 2021
  • Emergency on Huawei Phone 1 July, 2020

Follow Us On…

Follow us on FaceBook   Follow us on LinkedInFollow us on Twitter

Privacy Policy

Copyright ©Martin's HelpDesk 2018. Developed and Designed by martin's HelpDesk using the Genesis Framework and Executive Pro Theme